In this 5-minute read:
- Why remarket on Facebook?
- How to remarket on Facebook
- Step-by-step walkthrough for starting your remarketing campaign on Facebook
Remarketing is a powerful advertising method that allows you to reach customers who have already shown interest in your products or services by visiting your website. They are at least familiar with your brand and much more likely to visit you again from seeing your ads after they’ve visited you before.
In this article, we’re going to walk you through the remarketing powers of Facebook and how it can help you reach this interested audience.
With Womply Email Marketing, you can turn customers into regulars and get more repeat business with targeted emails that send automatically when customers transact with you. Learn more when you sign up for Womply Free!
Why should businesses remarket on Facebook?
Remarketing on Facebook isn’t for everyone, but if your ideal customer is spending a lot of time on the platform, then it’s a good place to increase your brand awareness and grow your customer base.
When you remarket an ad on Facebook, you are targeting customers who have visited your website and then showing your ad to them in their Facebook feed, videos, stories, and maybe even on Instagram, depending on how you set up your campaign.
Your Facebook ads will more often reach customers during a time when they are not too focused on a specific task at hand, creating a larger opportunity for them to visit your site from your ads.
You might also like: How to set up a Google Ads remarketing campaign
How to set up a Facebook Ads remarketing campaign
Let’s get down to it.
Step 1: Log into Facebook
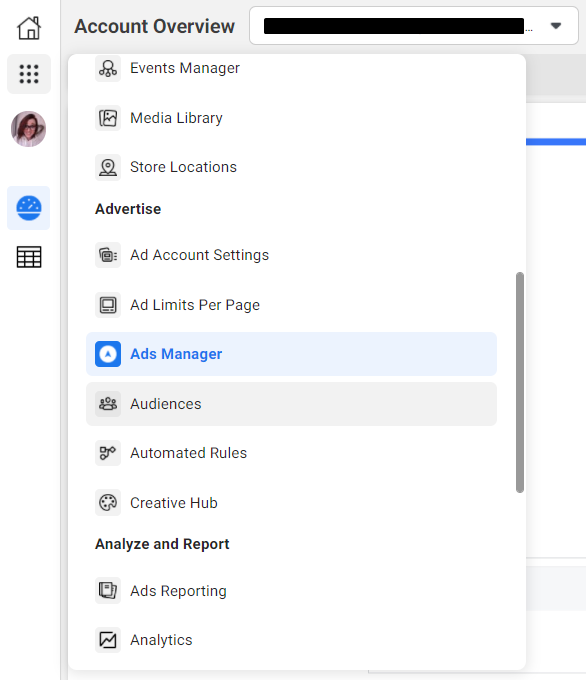
Go to Facebook.com/ads/manager and log into your Facebook account. Then click on the grid menu icon on the left of the page and scroll down to “Audiences.” Click that and move on to Step 2.
Step 2: Create an audience
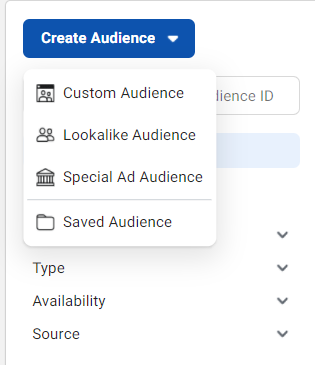
Once you are on the Audience page, click “Create Audience.” To create a remarketing audience, select “Custom Audience.”
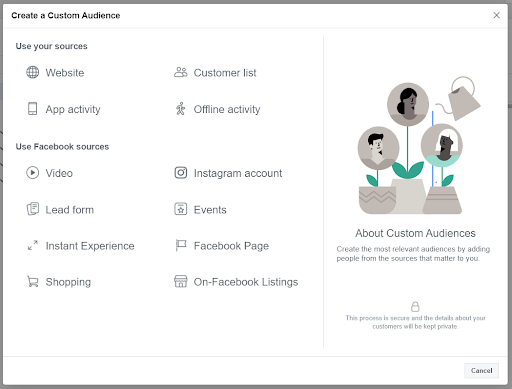
Next you’ll be brought to a window with several different sources that you can use to create your audience.
For the purpose of this guide, we’ll be selecting “Website.” But you can also create remarketing campaigns with customer lists that you already have, app activity, or how customers have interacted with you on Facebook and Instagram.
After you’ve selected “Website,” you’ll need to name your Facebook pixel–the code that will be embedded on your site to track cookies of your visitors.

Click “Continue” and proceed to creating your audience.
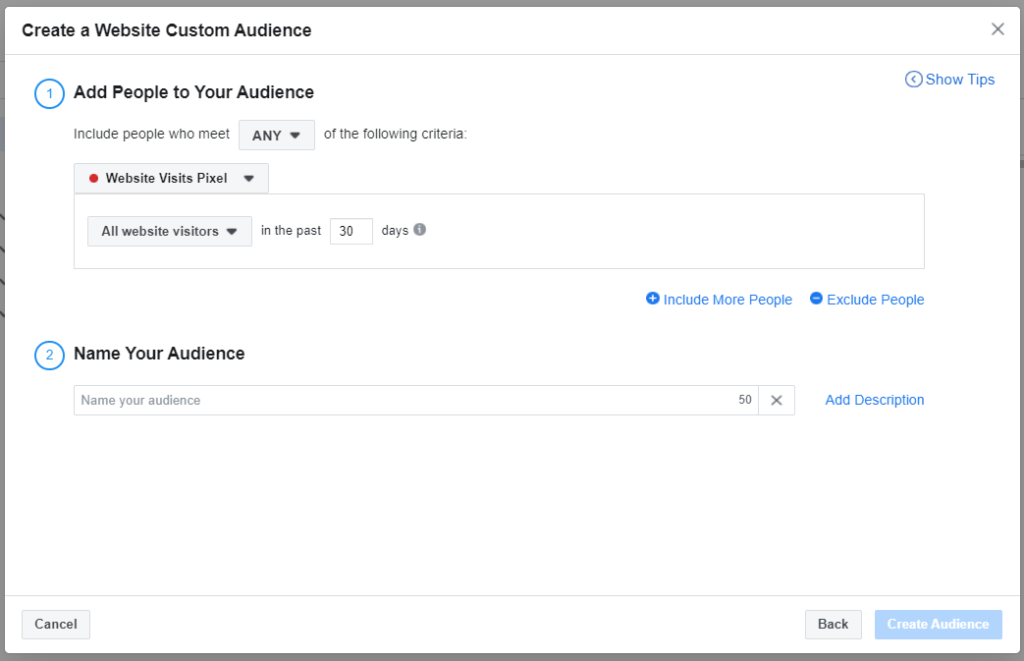
In the next window, you can choose how you want the Facebook pixel to track your website visitors. Your options are:
- All website visitors
- People who visited specific pages
- Visitors by spent time
We’ll be selecting “All website visitors” but you may choose to enter a specific page, like a specific product or a free trial page that you want to target. If that’s the case, select “People who visited specific web pages” and enter the URL into the field that appears.
After that, name your audience and then click “Create Audience.”
Step 3: Add a Facebook pixel to your website
Now it’s time to grab your Facebook pixel and add it to your website. To get the Facebook pixel from the audience you just created, click on the grid menu icon in the left menu bar and scroll down to “Events Manager.” Click that.

You should now see the pixel that you created with your audience. Select that and click “Continue Pixel Setup.”

Click “Email instructions” and email the code to your web developer.
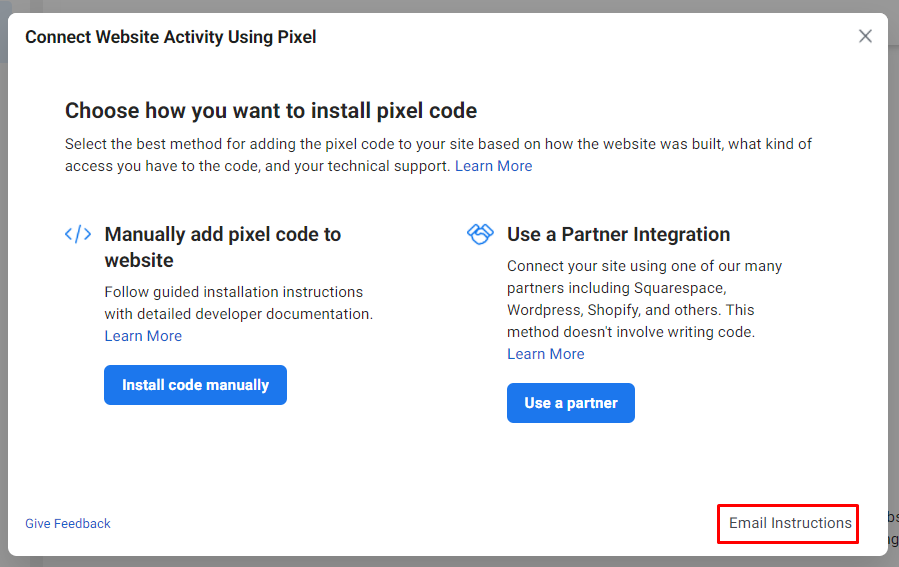
Enter their email and click “Send.”
Once your web developer has installed the pixel code in the header tags of every page on your website, your audience will start to build. Then anyone who uses Facebook and has visited your website can start to see your ads.
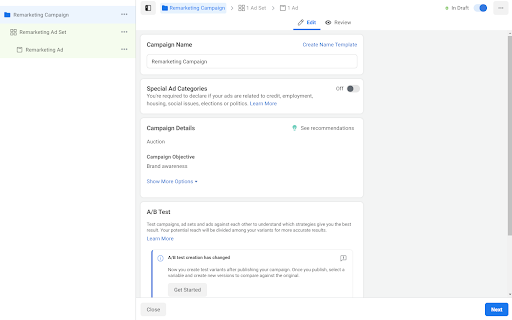
Step 4: Create your ad
Of course a remarketing campaign is only successful if you have an ad to show. Go back to your Ads Manager.

Click “Create” and choose a campaign objection.
Brand awareness and lead generation are both good options for remarketing campaigns.

Once you click your goal, you’ll have the option to name your campaign. We highly recommend doing this so that you can stay organize and easily identify this campaign if you have multiple campaigns running.

Click “Continue.”
Ads Manager will now walk you through the creation of your ad. On the first page, unless you want to apply any special settings, you should be fine using the default settings and clicking “Next.”
On the next page, set your daily budget and the length of time that you want to run your ad for. You can always extend your ad or increase the budget on it later if you want to start small and see how it performs.

Next, it’s time to add your audience. Click in the search bar and find the remarketing audience that you created.
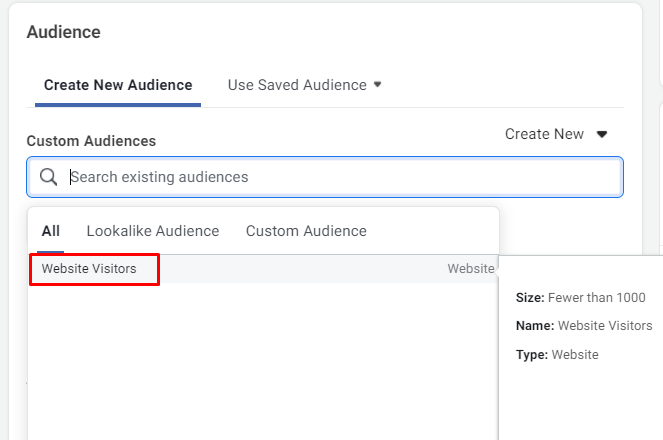
You can also apply additional demographic settings to your audience if necessary. Be sure to click “Save this audience” if you’ve applied any other settings and want to use that same audience on other ads in the future.

Click “Next.”
Finish up your ad creation by adding your assets (images or videos) and ad copy.

We also recommend adding a website URL to your ad to drive customers back to your website to make a call or purchase.

Next, be sure to check “Facebook Pixel.” You can check this box before your Facebook pixel is set up, your ads just won’t show until your audience starts to build from the pixel on your site.

Click “Publish” and watch as your ads are shown to more qualified leads with your remarketing campaign.
Maintain customer relationships with email marketing
As you continue to grow your business and gain new customers from your marketing efforts, put a plan in place to help continue to cultivate those relationships. Email marketing is a great way to do that.
With Womply’s automated email marketing engine, you can schedule customized emails to go to customers at opportune moments. You might send reminders about items left in a shopping cart, a happy birthday message, or notify them about upcoming deals.
Learn more, plus get free reputation monitoring and customer insights when you sign up for Womply Free!